 Here’s a handy step-by-step guide describing the proper installation procedure for a shaft–style septic aerator.
Related Articles: Aerator Types | Understanding Septic Tank Aeration
- Disconnect the power from existing aerator.
Water and electricity don’t play well together so it’s very important to take safety precautions. Make sure that you disconnect the power from existing aerator prior to removing aerator from tank. If the power to the aerator is on a house breaker, do not just flip the breaker off.
- Ensure the tank does not require pumping.
Once the aerator is removed from the tank, use a flashlight and inspect the interior of the tank. If you find a lot of floating debris then your tank likely requires pumping. If it’s been over 4-5 years since your last tank pumping or if you do not know when the tank was last pumped then you should have the tank pumped out prior to replacing the aerator. Just replacing the aerator by itself without pumping the tank will not improve the performance of your septic system
- Determine and resolve reason for failure of original aerator.
Once the existing aerator is out of the tank, inspect it for wear. In some case, debris may wrap around the shaft causing the unit to fail. This would be an indication that your tank needs to be pumped. Determine if there is a sewer backup or blockage in the outlet pipe of the septic tank. Also check for an electrical problem. Use a voltage meter to check the power at the tank to ensure that power is working correctly. Replacing an aerator without addressing these issues will not resolve your septic system problem.
- Assemble the unit per the manufacturer’s instructions.
You’re now ready to assemble the aerator unit. Follow the manufacturer’s assembly instructions that were included with the aerator.
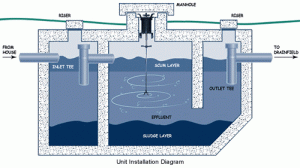
- Install aerator in tank.
Place the aerator, shaft end first, into the tank through the riser. The lower motor housing brackets should rest on the bottom of the riser opening and the top brackets should fit snuggly against the sides of the tank riser.
- Make sure you are using the proper size mini-breaker in the control panel or use the manufacturer supplied mini-breaker. An improperly sized breaker does not provide proper protection from aerator failure
- Make sure nothing is interfering with the rotation of the shaft such as loose wires
- Make sure aerator brackets are tight and that aerator is secure in tank riser. A loose aerator will not operate properly and will wear out quicker.
- Make sure electrical plug end is free of corrosion
- Ensure proper voltage reading of power to aerator. Insufficient power will reduce the ability of the aerator to produce proper air flow into tank
- Make sure control panel or timer is set correctly per manufacturer’s instructions
- Reconnect power to aerator.
Aerators are made to run continuously and do not have on/off switch. Once you plug the aerator into the electrical source, the aerator will start.
- Replace the tank riser cover.
Once you’ve followed these steps and your aerator should be operating properly. We recommend that you inspect the aerator every few months to ensure that is continuing to operate properly. If you need to remove the aerator to inspect it, make sure you follow the safety precautions outlined above.
 In a
In a 


